
Make an Accurate Digital Stylus Force Gauge from a Pocket Scale
Lately we have noticed a number of overpriced digital stylus force gauges on the market. Why pay these ridiculous prices when you can alter an inexpensive digital scale to serve as a highly accurate stylus force gauge in about 20 minutes! The scale we modified is larger and heavier than what I would consider ideal but we made this one 5 years ago when small, cheap scales were not as readily available as they are today. I would suggest using the lightest scale you can find for this project. Our directions for shaping the stylus platform do not include exact measurements because chances are the scale you will be using will be different from the one we used. However the material used and the principals involved are the same.
Cutting out the platform
The first step is to cut the stylus platform from a piece of .8mm Lexan sheet. This material is readily available at a model shop. It is easily cut with a ruler and box cutter. We used Lexan because it will withstand the sharp 90 degree bends without breaking and will hold it's shape. You should cut the platform about 3/4" in width. The exact length will depend on the digital scale you will be using and how far you need to step down to have the platform at the correct height. You can always cut it a bit long and trim off the excess when you make the last bend.
The first step is to cut the stylus platform from a piece of .8mm Lexan sheet. This material is readily available at a model shop. It is easily cut with a ruler and box cutter. We used Lexan because it will withstand the sharp 90 degree bends without breaking and will hold it's shape. You should cut the platform about 3/4" in width. The exact length will depend on the digital scale you will be using and how far you need to step down to have the platform at the correct height. You can always cut it a bit long and trim off the excess when you make the last bend.

Putting the bends in the platform
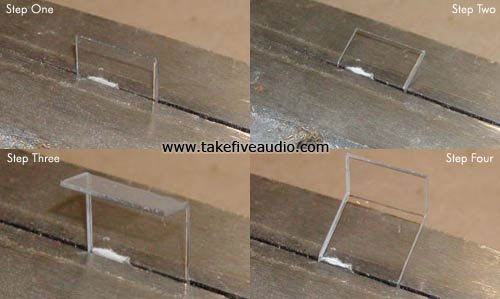
Now that you have the Lexan strip cut to length the next step is to put the bends in the stylus platform. We clamped the Lexan strip in a vise to make the bends in just the right spot but you could use a pair of pliers. When you have the Lexan strip secured in the correct spot simply bend it over with your thumb. Next secure the strip where the second bend needs to go and repeat.
Now that you have the Lexan strip cut to length the next step is to put the bends in the stylus platform. We clamped the Lexan strip in a vise to make the bends in just the right spot but you could use a pair of pliers. When you have the Lexan strip secured in the correct spot simply bend it over with your thumb. Next secure the strip where the second bend needs to go and repeat.
Fine tuning
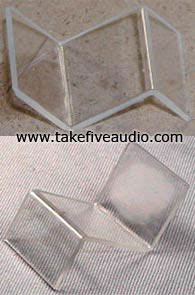
When you remove the Lexan strip from the vise it should look like the one below. You can fine tune the bends so that they are perfectly 90 degrees (if that is what is required for your particular scale). Next take some fine sandpaper and make some circular scratches in the stylus platform,(note scratches in lower photo) this will roughen the surface so your stylus will not easily glide off the platform and possibly be damaged when used with arms where the anti skate can not be set to zero such as the Regas.
When you remove the Lexan strip from the vise it should look like the one below. You can fine tune the bends so that they are perfectly 90 degrees (if that is what is required for your particular scale). Next take some fine sandpaper and make some circular scratches in the stylus platform,(note scratches in lower photo) this will roughen the surface so your stylus will not easily glide off the platform and possibly be damaged when used with arms where the anti skate can not be set to zero such as the Regas.
Mounting the platform
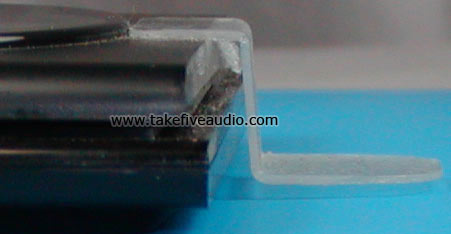
This photo shows how the stylus platform is mounted to the weighing platform of the scale. We used a clear transfer tape (double sided) to attach the stylus platform to the scale. The one in the picture has been in service about 5 years and has never come loose. The key here is to make sure the stylus platform is the thickness of a record above the surface the scale is sitting on (your turntable platter). This would be about 2mm.
This photo shows how the stylus platform is mounted to the weighing platform of the scale. We used a clear transfer tape (double sided) to attach the stylus platform to the scale. The one in the picture has been in service about 5 years and has never come loose. The key here is to make sure the stylus platform is the thickness of a record above the surface the scale is sitting on (your turntable platter). This would be about 2mm.
But is it accurate?
Ultimately this scale needs to be accurate. The first thing most folks I have shown this to ask is "does it weigh accurately with the tab on the side like that?" The answer is "yes it does". We have verified this with a series of tests. First we made a test weight from a small spade, we trimmed the spade till it weighed 1.20 Grams exactly on our reference scale. We then sat the weight in 5 different positions on the scales weighing platform and then finally on the stylus platform we attached to the scale, the scale read 1.2 grams in all 6 positions. This is the same reading we get on our reference Winds scale which retails in around the $800.00 USD mark. Mind you the Winds resolves to 100th of a gram but you can find a cheap digital scale that resolves to 100th of a gram from any scale retailer or ebay.
Ultimately this scale needs to be accurate. The first thing most folks I have shown this to ask is "does it weigh accurately with the tab on the side like that?" The answer is "yes it does". We have verified this with a series of tests. First we made a test weight from a small spade, we trimmed the spade till it weighed 1.20 Grams exactly on our reference scale. We then sat the weight in 5 different positions on the scales weighing platform and then finally on the stylus platform we attached to the scale, the scale read 1.2 grams in all 6 positions. This is the same reading we get on our reference Winds scale which retails in around the $800.00 USD mark. Mind you the Winds resolves to 100th of a gram but you can find a cheap digital scale that resolves to 100th of a gram from any scale retailer or ebay.


